4th period:Electrical work - Prep ver.
Let's make a height scale
We talked about how to use Raspberry Pi 3 Model B to produce the mechanism. As a result, I decided to make a height scale.
Many things using IoT technology with scale have already been commercialized. It is "Smart scale”. As we are still high school students and our height has been growing, we actually want to know the height rather than their weight. However, since there is no height scale at home, we decided to conduct the experiment on whether IoT's mechanism can be used to create a "Smart height scale".
 We will explain the mechanism of the height scale.
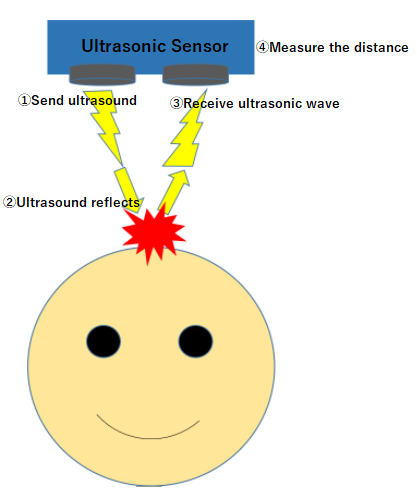
This height scale measures the distance using an ultrasonic sensor.
The ultrasonic sensor has a transmitter and a receiver, and ultrasonic waves emitted from the transmitter receive ultrasonic waves reflected by the receiver when reflected by the object.
It calculates the distance by measuring the time from when the ultrasonic wave is emitted until it is reflected and received.
This is the height scale we make this time using this ultrasonic sensor mechanism.
The ultrasonic sensor is installed at a certain height (this time set to 2 m), and a person stands below it. Ultrasonic waves emitted from the sensor hit the head of the underlying person, and the receiver receives the reflected ones and measures the distance.
Since the distance of the sensor is fixed, if you subtract the measured distance from the height of the sensor, you will know the height of the person under the sensor.
| Raspberry Pi 3 Model B | It is the main body (it is convenient if there are cases) |
| Micro SD card | We write OS in it |
| PC | Although it is also possible to connect with the monitor using the HDMI cable, this time we will use a laptop PC |
| USB AC adapter (2.5A compatible) | It is used for power supply |
| Micro USB cable | It is used to connect AC adapter and Raspberry Pi |
| USB serial conversion cable | This time we use a laptop computer, so we need it |
| LAN cable | Although it is also possible to use wireless LAN, because of the complicated setting, this time we will connect with wire |
| Ultrasonic distance sensor | We use it to create a height scale |
| Jumper wire | It is used when connecting ultrasound distance sensor and Raspberry Pi |
| Breadboard | It is used for wiring ultrasonic sensors etc. |
The initial setting process is as follows.
1. Write in OS → 2. Connect to PC → 3. Setting for language etc
1. Write in OS
- Plug the Micro SD card into the PC and format it.
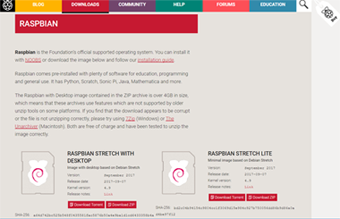 Download the OS from Raspberry Pi's homepage (English).
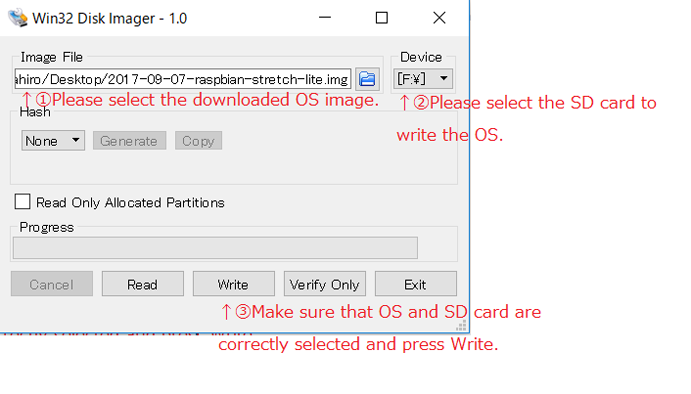
OS download "Raspbian Stretch". As the downloaded file is a ZIP file, decompress it.- Write OS to Micro SD card. This time, since we use Windows PC, we use Win32 DiskImager to write.
- We will rewrite the OS.
The reason is to use Raspberry Pi 3 and laptop PC this time. Raspberry Pi 3 is a serial console used when connecting USB serial conversion cable cannot be used, because it is set to use Bluetooth under standard setting. First, open the file in the SD card and edit config.txt. I used Tera Pad for editing. Add the following code to the end of the file of Config.txt.
dtoverlay=pi3-miniuart-bt Please save after adding.
2. Connect to PC
- Connect the PC and Raspberry Pi.
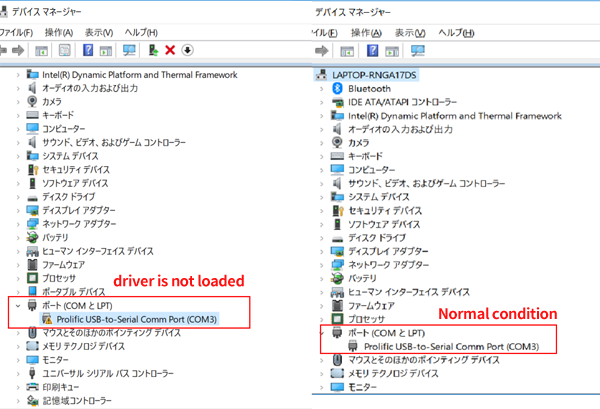
First, connect the USB serial conversion cable to the PC. After that, start Device Manager and confirm the connection. If “!” is displayed, install the driver corresponding to the cable.
- After confirming the connection of the USB serial conversion cable, connect the cable of the conversion cable with no USB terminal to 6 (GND), 8 (RX), 10 (TX). Please be careful not to get stuck on a different pin. Raspberry Pi has 40 pins.
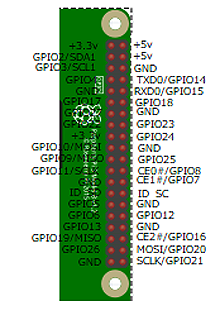
The pin arrangement is as shown in the figure. 3.3 V, 5 V plus power supply and GND is a minus power supply. In addition,GPIO stands for "General-purpose input / output", meaning general purpose input / output. Data can be exchanged by connecting a sensor etc. to this pin.
-
You will start it. This time login using the serial console.
Install Tera Term on PC and start it.
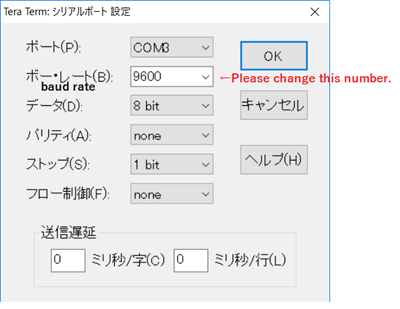
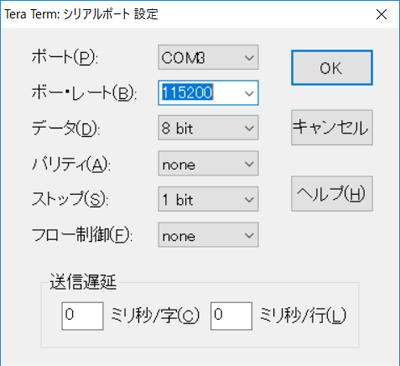
When the "New connection" screen appears, select "Serial" and press OK Then set "baud rate" to 115200 from "Setting (S)" → "Serial port (E)".
Once done, start up by connecting the AC adapter and Raspberry Pi with a micro USB cable.
It is a success if the start log is displayed on the Tera Term screen.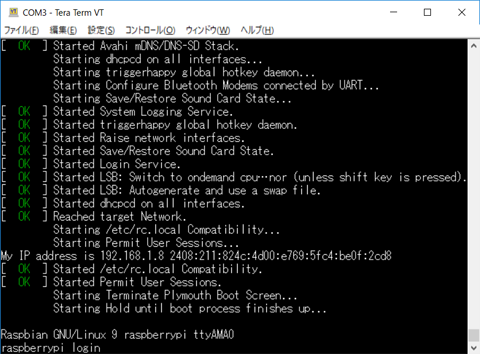
After that you will be prompted for your user name and password, please enter each and press the Enter key.
By default you can enter the following.
User name (login :) pi
Password (password) raspberry 3
3. Basic settings
Next, you will go through the basic settings. Let's start the setup tool first.
sudo raspi-config
For basic operation, you can select menu with the up and down keys, select "Select", "Finish", item with TAB key. Press "Enter" to select "OK", Finish → Press the Enter key to exit.
- Change user / password
As we mentioned, unless you change the settings, the user name and password are all the same. If you are "insecure about security", select "Change User Password" and let's change. - Specify time zone
We will not use it for this experiment, but I'd like to set time zones for future as well. By default the Coordinated Universal Time is in effect and there is a considerable time difference from Japan Standard Time. At this time, the program that utilizes time does not operate normally, so change the setting to Japan Standard Time. Changing the time zone is completed if you select it as follows.
[Internationalisation Options → Change Timezone → Asia → Tokyo]
Finally check the time zone when you have finished selecting.
$ date
It will be completed if "JST" is displayed after the day of the week, date, etc.
This completes the basic setup. There are other Wi - Fi settings etc., but this time it will not use LAN cable.
Since setting of Raspberry Pi is over, next let's go through the experiment of "Smart Height Scale".