4th period:Electrical work - experiment ver.
Let's make a height scale
It was a hard work for you to set up Raspberry Pi. We would like to conduct electronic work experiments at last. From now, we will go in the following order.
1. Preparing the programming environment → 2. Programming of Raspberry Pi → 3. PC programming
We think that it will become more often to fail from here on, but let's keep on doing your best.
1. Preparing the programming environment
First of all, let's prepare the environment of the underlying programming.
Node.js is a server-side JavaScript environment. Although it may be hard to imagine by words alone, in short, it is an execution environment that enables processing to be performed even in places such as browsers that are invisible.
Node.js can use packages using management software called npm.
Think of packages as containers that summarize the functions necessary to connect humans and machines.
- Installation of Node.js
Installing on PC is easy, but installing to Raspberry Pi is a bit complicated.
This time we use v0.12.15. Although it is not the latest version, we use the old one to use the ultrasonic distance sensor.
Version control of Node can be done easily using the system nvm.
(1)Installation of git$ sudo apt-get install git-core
Now, you can use git.
(2) Installation of nvm$ git clone https://github.com/creationix/nvm.git /usr/local/nvm
$ source /usr/local/nvm/nvm.sh
Now you can install nvm and enable it.
(3)Installation of Node.js (Installation takes 1 hour or more.)$ nvm install v0.12.15
Installation of Node.js is complete. Finally, check if the installation succeeded.$ nvm ls
- Installing npm and packages
Let's install npm this time after installing Node.js.
(1)Installation of npm
$ sudo apt-get install npm
When you receive a confirmation message, please enter "y" to start the installation.
(2)Installing packages
We will use two packages "r-pi-usonic" and "socket.io" this time. "r-pi-usonic" is for connecting Raspberry Pi and ultrasonic sensor, "socket.io" is a package for asynchronous bidirectional communication.
$ npm init
Here are some questions, please press the Enter key for all questions.
$ npm I -D r-pi-usonic socket.io
2. Programming of Raspberry Pi
- Let's do the wiring before starting the programming.
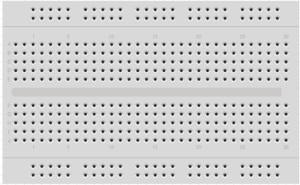
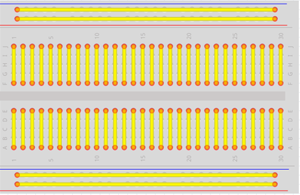
We use breadboard for wiring. Breadboard is like a base on which circuits can be made without soldering. Although the appearance is a plate with only holes vacant at even intervals, the inside seems to have electricity flowing like the yellow line in the figure. Let's not make a mistake as the role is also written on the ultrasonic sensor pin.
Vcc ― 5V
Trig ― GPIO18
Echo ― GPIO17
GND ― GND - (1)Please create the distance.js file.
$ nano ~/Public/app/distance.js
(2)Please create the following code.(3)Please execute after saving.Click here for the code$ sudo node ~/Public/app/distance.js
It will be successful if a numerical value appears after "Distance:” Let's try to hold the hand in front of the sensor and change the value. - If you only measure the distance you can do with this code alone, but this time we will allow the browser to display the results.
(1)Create app.js file.$ nano ~/Public/app/app.js
(2)Please create the following code.(3)Please execute after saving.Click here for the code$ sudo node ~/Public/app/app.js

3. PC programming
 Now that Raspberry Pi is ready to reflect the data in the browser, let's prepare the PC side next time.
- Create a directory on the connected PC.
$ mkdir -p ~/Sintyou
$ cd Sintyou - Create html.index in this directory.
$ nano index.html
- Edit index.html
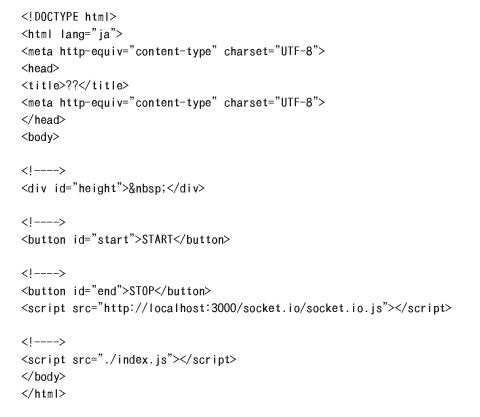
- After saving, create index.js
$ nano index.js
- Edit index.js as follows
Click here for the code - Let's execute index.html after saving.
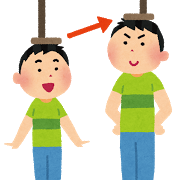 When you push the Start button, the value obtained by subtracting the numerical value measured with distance.js from 200 appears. Let's set the ultrasonic distance sensor at the height of 2 m from the floor when the work so far is completed. If you want to raise the height to be installed, height should be measured correctly if you change the number "var criteria = 200" in index.js to the height you want to set.
Experimental Results and Discussion
 We've introduced the experimental procedures so far, but as a result of our own making this time, we could only reach the distance to measure with Raspberry Pi.
Although we went up to Editing Index.js, when we pressed "start", the numerical value did not reflect in the browser.
<Possible Factors>
●Spaces should be half-width by nature, but they have been typed in full-width.
●Data exchange between Raspberry Pi and the browser does not work well for some reason.
●There was something unexpected in the code, so the response did not come back.
And so on.
Although we reviewed the setting many times, rewrote the source, checked it on books and the Internet trial and error, unfortunately, we could not solve it until the deadline of this web page.
<Survey of sensors>
In this issue, we investigated the accuracy of distance measurement by ultrasonic distance sensor. First, when we checked the distance to the board placed at a distance of 20 cm from the sensor, we were able to measure the value of almost 20 cm although it was not exactly the case.
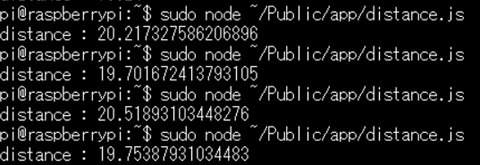
Next, place the board diagonally in the same 20 cm place to examine. As a result, you can see that a rather large error is born.

This is because ultrasonic waves are reflected in various directions because the plate is tilted, so even if ultrasonic waves are received, it is not possible to obtain accurate numerical values.
![]() Summary and impressions
Summary and impressions
At the 4th hour we challenged the electronic work experiment using Raspberry Pi.
We could not complete the goal of the experiment (measuring the height with the Smart Height Meter), but we were able to reach the purpose of this page "Enjoy electronic work" and "Think about the mechanism of IoT". At the same time we learned the difficulty of building IoT using commands and so on.
On PCs in the GUI environment you are currently using, you can easily perform operations such as downloading data and creating new files, but to enable you to perform operations on your computer with only characters using programming we think that the difficulty of doing it is that you can actually experience Raspberry Pi and other equipment when you try it.
We are sorry that we could not show you the "Smart Height Scale", but regrettably, try making programming and IoT by actually making various ideas.
We also think about the next idea and we would like to try again!